CF x A Pair & a Spare Tutorial: DIY Printed Trim Mini Skirt
0 71 1 minute read
Editor’s Note: This is a guest post by our friend Geneva from A Pair & a Spare – she created this DIY tutorial exclusively for CF readers, and we’re so excited to share it with you! Read on to check it out and don’t forget to visit Geneva’s blog for even more amazing DIYs!
AI01
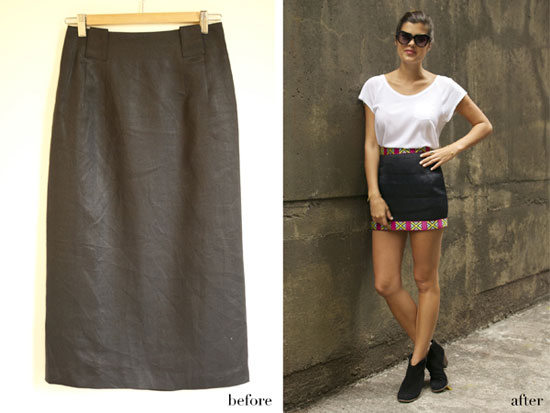
In the lead up to Spring, I’ve been pondering how to create a few chic pieces for my wardrobe without breaking the bank. A while ago I picked up some printed grosgrain trim in my local craft store and also found a somewhat nondescript black skirt in the back of my closet, and knew that with a little imagination and elbow grease these two would be perfect base for a pattern-embellished mini skirt.
Read on to learn how to create this fun spring skirt from start to finish.
Table of Contents
You’ll need:
A black skirt – check out your local thrift or dollar stores.
Around 80 inches (2 metres) of printed grosgrain trim – available at craft/sewing stores
A needle and thread (or sewing machine)
Scissors
How to:
1. To create the basic mini skirt, I shortened the longer skirt to mini length. To do this, measure the appropriate length by using a skirt you already wear as a guide for cutting.
2. Hem the skirt by rolling the fabric over and sewing down.
3. Cut two pieces of printed trim to match the length all the way around the hem and waistband.
4. Hand sew (or use a sewing machine) to attach the printed trim to the waistband and the hem – sewing both edges to secure.
And there you have it, a perfectly chic, on-trend and inexpensive mini skirt which will take you into spring without so much as a backwards glance!
Your thoughts?
Did you enjoy this tutorial? Will you be trying it yourself? Any other DIYs you’d like to see here next? Let us know by leaving a comment below!
Tips: "Amazon, Amazon Prime, the Amazon logo and Amazon Prime logo are trademarks of Amazon.com, Inc. or its affiliates". AS AN AMAZON ASSOCIATE, WE EARN AFFILIATE COMMISSIONS FROM QUALIFYING PURCHASES.