Specialty:
This can be done in no time; all that you need is minimal cutout and prints of the vegetable and fruit shapes.
Materials:
- Print out and a cutout of fruits and vegetable paper
- Scissors
- Paints and brushes
How to do:
- Take the printout sheet at first
- With the help of scissors, cut them neatly and in a precise way
- Take painting colors and paint in the colors of fruits and vegetables
- This can teach kids how they look and their shades, too, in a fun way.
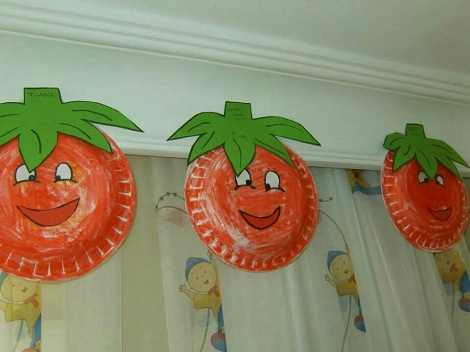
18. Paper Plate Tomatoes:

How about the fun paper plate tomato craft making? You can do the same for other fruits and vegetables in round shapes, such as apples and melons. Let us see how to get started with this easy and quick craftwork for kids.
Specialty:
These paper plate crafts are both easy and fun to do. And the same method can be replicated to a variety of fruits and vegetables too.
Materials:
- Paper plates
- Paper
- Scissor
- Paints
- Glue
How to do:
- Take the paper plates and color them as required. For example, in case you are replicating tomato, add a red color.
- On white paper, you can outline the top green stem end and cut it out to glue to the paper plate.
19. Fingerprint Craft Maize Plant:

This is a simple fingerprint craft that can replicate the entire plant display of your favorite fruits and vegetables. For example, here we see the case of maize. It is a colorful, bright, and fun way to learn about how the plants look like as well. We absolutely love this one, and it makes great fruit and vegetable art projects for toddlers.
Specialty:
It can also be used as a good display artwork drawing in the kid’s room. Isn’t it cool?!
Materials:
- Paints
- Rope
- Paper
- Glue
- Scissors
How to do:
- Take the paper and use the rope or thread in a thicker texture to exhibit the stems and branches of the plant.
- Use your fingerprint in color paint to add on to the shape of maize, as we see in the picture above.
- With the help of white paper, outline the required shapes of other parts and cut them out.
- Glue it neatly around. You are good to go!
See More: Best Butterfly Crafts & Activities
RELATED BEST 10 ON AMAZON:
| IMAGE | TITLE | TRENDS | SEE MORE |
|---|
 | Adorable Fruits & Vegetables to Crochet: Delicious Decorations for Your Table | 1171.2 | MORE VIEW |
|---|
 | Balance of Nature Fruits and Veggies - Whole Food Supplement with Superfood Fruits and Vegetables for Women, Men, and Kids... | 37157.4 | MORE VIEW |
|---|
 | FeelGood Superfoods Vita Fruits and Veggies Dietary Supplement Capsules Made from 25 Superfood Ingredients, Fruit and Vege... | 6075.9 | MORE VIEW |
|---|
 | Preserving Everything: Can, Culture, Pickle, Freeze, Ferment, Dehydrate, Salt, Smoke, and Store Fruits, Vegetables, Meat, ... | 4671.8 | MORE VIEW |
|---|
 | How to Grow Your Own Food: An Illustrated Beginner's Guide to Container Gardening | 1508.7 | MORE VIEW |
|---|
 | Country Farms Super Fruit and Veggies Capsules, 30 Fruits and Vegetables, 30 Servings, 60 Count (Pack of 1) | 18352.4 | MORE VIEW |
|---|
 | Balance of Nature Fruits and Veggies - Whole Food Supplement with Superfood Fruits and Vegetables for Women, Men, and Kids... | 7699.5 | MORE VIEW |
|---|
 | 2-Pack N1N Premium Organic Green Superfood, Fruits & Veggies [28 Powerful Ingredients] Natural Supplement with Alfalfa, Be... | 4030.4 | MORE VIEW |
|---|
 | Balance of Nature Fruits and Veggies - Whole Food Supplement with Superfood Fruits and Vegetables for Women, Men, and Kids... | 37157.4 | MORE VIEW |
|---|
 | Prescription for Nutritional Healing, Fifth Edition: A Practical A-to-Z Reference to Drug-Free Remedies Using Vitamins, Mi... | 26846.4 | MORE VIEW |
|---|
 | Raised-Bed Gardening for Beginners: Everything You Need to Know to Start and Sustain a Thriving Garden | 26243 | MORE VIEW |
|---|
 | Mini Farming: Self-Sufficiency on 1/4 Acre | 22254.8 | MORE VIEW |
|---|
 | Natrol Juicefestiv Daily Fruits and Veggies Capsules with SelenoExcell for Improved Metabolism, Boosts Energy and Well-Bei... | 21357 | MORE VIEW |
|---|
 | N1N Premium Organic Superfood Greens [28 Powerful Ingredients] Natural Fruit and Veggie Supplement with Alfalfa, Beet Root... | 19659.6 | MORE VIEW |
|---|
 | Complete Dehydrator Cookbook: How to Dehydrate Fruit, Vegetables, Meat & More | 18712.8 | MORE VIEW |
|---|
 | Simply Nature's Promise - Fruit and Vegetable Supplements - 90 Veggie and 90 Fruit Capsules - Made with Whole Food Superfo... | 18475.8 | MORE VIEW |
|---|
 | Klutz Sew Mini Treats Craft Kit, 8" Length x 1.5" Width x 9" Height | 18441.4 | MORE VIEW |
|---|
 | Country Farms Super Fruit and Veggies Capsules, 30 Fruits and Vegetables, 30 Servings, 60 Count (Pack of 1) | 18352.4 | MORE VIEW |
|---|
Tips: "Amazon, Amazon Prime, the Amazon logo and Amazon Prime logo are trademarks of Amazon.com, Inc. or its affiliates". AS AN AMAZON ASSOCIATE, WE EARN AFFILIATE COMMISSIONS FROM QUALIFYING PURCHASES.


