Don’t you just love it when something that looks or seems really complicated or difficult ends up actually being a piece of cake? Yeah? Me too! One day as I was scrolling through my Instagram feed looking for inspiration, I came across the most gorgeous flower braid hairstyle ever. I knew right away that I needed to learn how to recreate it, no matter how hard it was. But guess what? It was simple! Today I will be showing you how to create a beautiful flower braid, how to incorporate it into different hairstyles, and some of my favorite products that I use to achieve my looks.
Recommended Video
Flower Braid Step by Step Tutorial
Follow the instructions below to master one of the most magnetic braids ever. This tutorial works for all hair lengths and textures. So let’s start braiding!
Step 1. To begin, you want to start with a few stitches of a regular three strand braid.
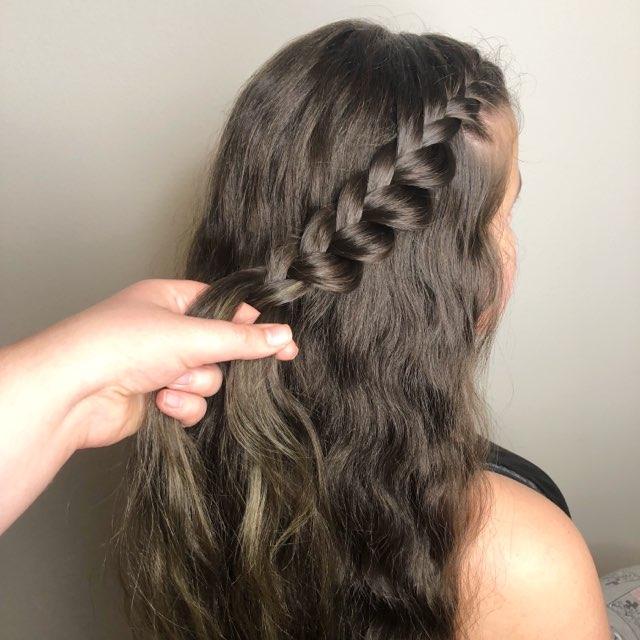
Step 2. Next, gently pull on the stitches of the braid on the outside edge to make them look big and fanned out. This technique is called “pancaking”.

Step 3. Continue these steps all the way down your braid. Make sure to braid only a few stitches and then go back and pancake as you go. If you wait to pancake you braid when you reach the end, the braid will be too tight and your pancaking will look messy and uneven.
Advertisement 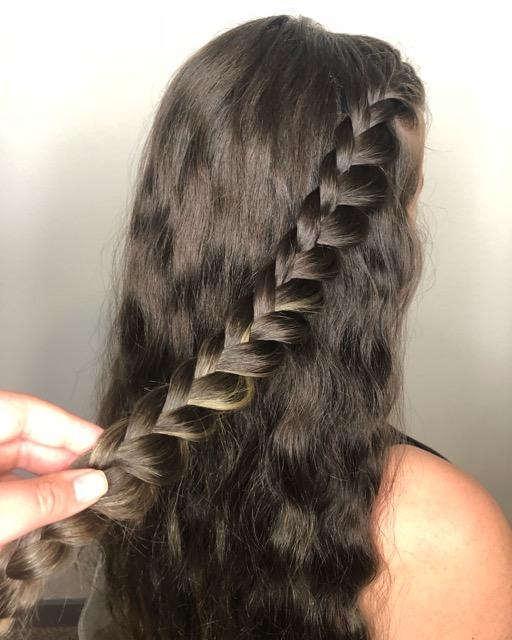
Step 4. When you reach the end of your braid, secure it with a small elastic. It should look like this:
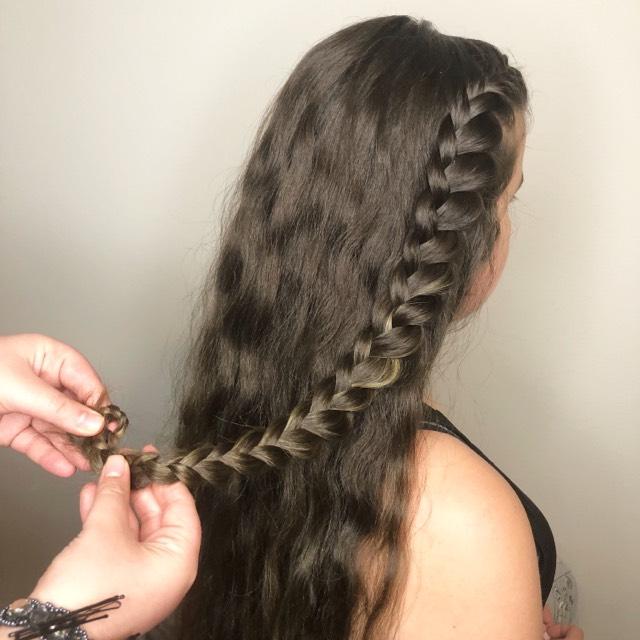
Step 5. Next, begin to roll your braid up into a spiral, with the pancaked side on the outside.

Step 6. Continue rolling your braid with the pancaked side facing out until you reach the head. (Having the outside edge pancaked gives a more ‘petal like’ effect to your flower!)
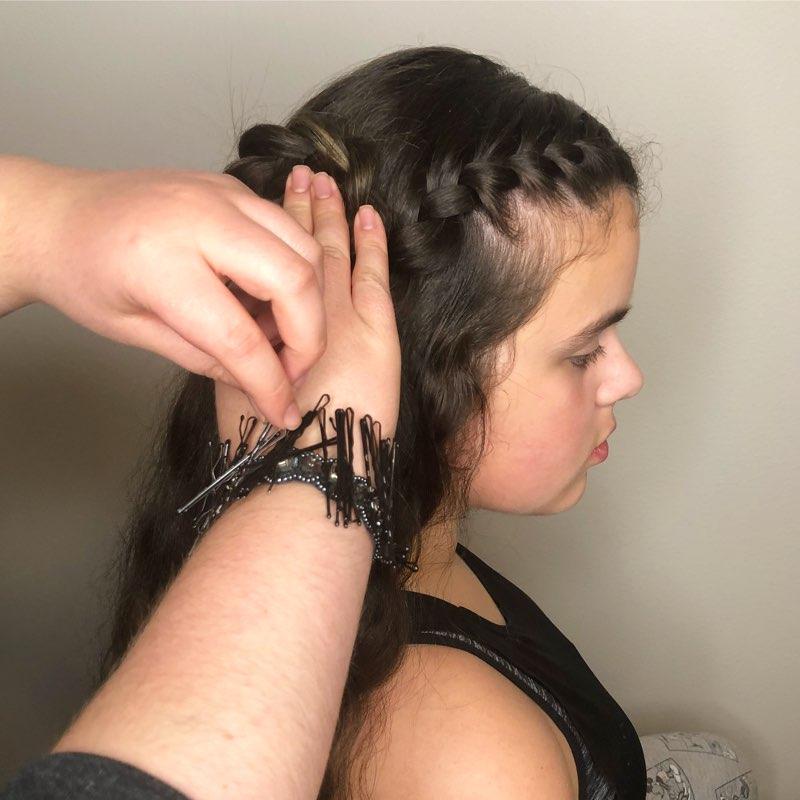
Step 7. Once you finish rolling up your braid, hold your flower steady and in place with one hand, and pin it down with the other. Here I am using Lala’s Updos and Pink Pewter’s magnetic bracelet to hold my bobby pins.
RELATED BEST 10 ON AMAZON:
| IMAGE | TITLE | TRENDS | SEE MORE |
|---|
 | Fbshicung 2Pcs Sewing Machine Presser Foot-Border Guide Presser Foot and Adjustable Guide Presser Foot Compatible with Dom... | 94.6 | MORE VIEW |
|---|
 | OBSCYON 27Pcs Hair Styling Set, Hair Design Styling Tools, DIY Accessories Hair Modelling Tool Kit Magic Fast Spiral Hair ... | 4871.6 | MORE VIEW |
|---|
 | Winkeyes Hair Styling Set, Hair Design Styling Tools Accessories DIY Hair Accessories Hair Modelling Tool Kit Hairdresser ... | 13946 | MORE VIEW |
|---|
 | 6PCS double bangs hairstyle hairpin headband for girls women Double Layer twist plait headband twister hair clip tools mag... | 2163.6 | MORE VIEW |
|---|
 | The Hollow: Hercule Poirot Investigates (Hercule Poirot series Book 25) | 6642 | MORE VIEW |
|---|
 | How To Draw Everything: Simple Sketching And Inking Step By Step Lessons (Beginner Drawing Guides) | 1094.8 | MORE VIEW |
|---|
 | Sculpting Foam for Men (7oz) - Firm Hold Volumizing Hair Mousse with Herbal Extracts - by Avenue Man Styling Hair Products... | 1776.6 | MORE VIEW |
|---|
 | Tik Tok Heatless Hair Curlers for Long Hair,Heatless Curling Rod Headband,No Heat Curlers You Can to Sleep in Overnight,He... | 6019.2 | MORE VIEW |
|---|
 | Whimsical Stitches: A Modern Makers Book of Amigurumi Crochet Patterns | 18748.8 | MORE VIEW |
|---|
| Winkeyes Hair Styling Set, Hair Design Styling Tools Accessories DIY Hair Accessories Hair Modelling Tool Kit Hairdresser ... | 13946 | MORE VIEW |
|---|
| The Hollow: Hercule Poirot Investigates (Hercule Poirot series Book 25) | 6642 | MORE VIEW |
|---|
| Tik Tok Heatless Hair Curlers for Long Hair,Heatless Curling Rod Headband,No Heat Curlers You Can to Sleep in Overnight,He... | 6019.2 | MORE VIEW |
|---|
| OBSCYON 27Pcs Hair Styling Set, Hair Design Styling Tools, DIY Accessories Hair Modelling Tool Kit Magic Fast Spiral Hair ... | 4871.6 | MORE VIEW |
|---|
 | DIY Braids: From Crowns to Fishtails, Easy, Step-by-Step Hair-Braiding Instructions | 3370.5 | MORE VIEW |
|---|
 | Magic Bun Makers 3 Pcs,LHAAAYF Professional Hair Bun Maker-Donut Hair- Perfect Hair Bun Maker-Ballet Bun Maker-Easy Bun Ha... | 2531.1 | MORE VIEW |
|---|
| 6PCS double bangs hairstyle hairpin headband for girls women Double Layer twist plait headband twister hair clip tools mag... | 2163.6 | MORE VIEW |
|---|
 | Fashion Double Layer Band Twist Plait Headband Hairpin Hair Claw Clips, Black Magic Double Bangs Hairstyle Hairpin Hair Tw... | 2062.8 | MORE VIEW |
|---|
 | 10PCS Spiral Hair Pins, Non-Scratch Ball Tips Screw Pins for DIY Hair Style (Black) | 1890.6 | MORE VIEW |
|---|
Tips: "Amazon, Amazon Prime, the Amazon logo and Amazon Prime logo are trademarks of Amazon.com, Inc. or its affiliates". AS AN AMAZON ASSOCIATE, WE EARN AFFILIATE COMMISSIONS FROM QUALIFYING PURCHASES.