DIY Nail Art Tutorial: Rhinestones

For the second article in my series about three-dimensional nail embellishments (in case you missed it, see the first one, DIY Nail Art: Loose Glitter), I’m going to to cover rhinestones.
One of the things I love about rhinestone nail art is that you can create so many different looks, from super-glamorous to girly to a little bit tough, depending on the size, color and shape of the stones. I know this may seem intimidating, but it’s easier than it looks!
There’s one thing I want to address before getting started: Yes, stick-on nail jewels that are made specifically for this purpose do exist, and may seem like they would be easier to use. However, there are several reasons why I recommend you use loose rhinestones bought from a fabric or craft store instead:
- First, you can get at least five times more jewels for a fraction of the cost. (I paid $2-3 per pack, as opposed to paying $5 for a small sheet of stick-ons from Sephora.)
- Second, there is a greater variety of loose rhinestones then there is of stick-ons made specifically for nail art. The options are endless!
- Third, I would argue that putting rhinestones on this way will give you a longer-lasting manicure than stick-ons will. Think about it: If they are made so you can pull them off a sheet of paper in order to stick them on, you can accidentally pull them off your nails just as easily.
Table of Contents
Rhinestone Manicure, Step by Step:

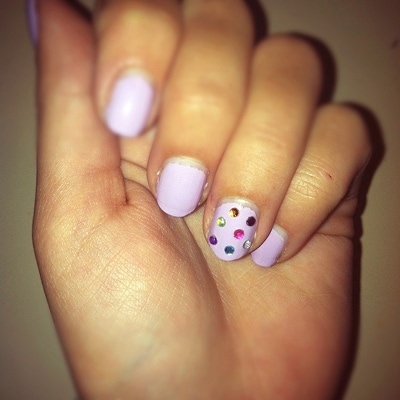
Let’s get started! Here’s everything you need to know to give yourself a rhinestone manicure like the one above.
What You Need:
- Base coat – I used Orly Bonder Rubberized Base Coat (both under the polish and to place the jewels on the nail).
- Nail polish
- Top coat – I used Sally Hansen Hard as Nails Top Coat.
- Some type of small stick – This could be an actual orange stick for manicures or it could be something as simple as a toothpick. Anything around that size should do the job.
- Pack of jewels with flat backings – I got mine at a fabric store for $1-3/pack. I wanted a variety of different gems to make some cool designs, so I bought several packs, but one pack would be more than enough to cover your nails.
What To Do:
Before you begin, make sure that the rhinestones you’re using are set out, right-side up, on a flat surface. This will make them easier to pick up later. Now it’s time to bejewel your nails:


