20 Easy Butterfly Craft Making Ideas You Can Do With Your Kids!
Butterflies have always fascinated us and are an indispensable part of any DIY craft. Butterfly craft ideas offer us endless options to experiment and create things of beauty through crafting. Creating beautiful things using butterfly designs helps alleviate stress and forget the outside world’s hustle and bustle. Scroll down to find umpteen practical crafting options using various materials that we can happily indulge in and bring joy to others!
20 Best Butterfly Crafts & Activities:
1. Paper Craft Butterfly:

This is a fun butterfly craft activity, especially for kids, and consists of only cutting paper and folding. Making these beautiful and colorful butterflies teaches the children more about the nature around them, and they also learn to appreciate their beauty.
Speciality: These beautiful butterflies are helpful as paper decorations for festivals and Christmas celebrations.
Materials:
- Color paper
- Scissors
- Thread
How to Do:
- Take a square sheet of paper, as shown in the picture.
- Fold the paper in half and cut.
- Fold the corners in one half of the paper as triangles.
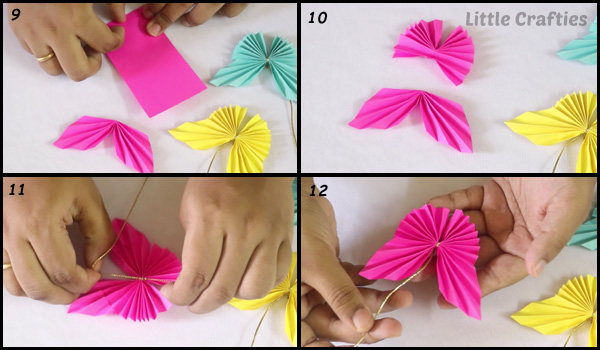
- The fold should be an accordion pleat.
- Now fold the paper from the middle.
- Repeat the same with the second half sheet of paper
- Use the thread to tie both the pieces together.
- When you spread the pleats like a peacock’s feather, you will get a beautiful butterfly.
2. 3D Butterfly Craft:

Making a 3D papercraft butterfly is a lovely craft that is easy to make and is based on origami folds but involves glue. It is a great craft to introduce to youngsters to start with.
Speciality: These gorgeous butterflies make an excellent addition and decoration to your child’s room
Materials:
- Two pieces of square paper
- Black paper
- Glue
- Scissors
How to Do:
- Fold a new square paper diagonally to form a triangle.
- Turn the triangle, as shown in the picture.
- Fold the right-hand side tip towards the top point, and create a perpendicular in the centre.
- Repeat the same with the left side
- The square will be smaller, more like a diamond shape.
- Bring the top right side folded point down and align it with the edge of the diamond.
- Ensure that the crease is stiff
- Repeat the same for the left side
- Do this twice for two wings
- Take the black paper and cut out two pieces approximately one centimetre in width and around six centimetres long
- Then a thin black strip of paper for the paper butterfly’s antennae.
- Stick the antennae of the butterfly to the base with glue.
See More: Creative Dinosaur Crafts Ideas


